This document describes how to use Groupboard Designer's JavaScript User
interface. For information on the more advanced
topics in administrating the Groupboard, see the Administration Guide.
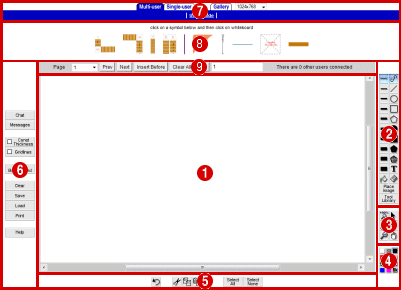
 | Design Canvas |
| | Press the left mouse button to draw on the canvas. Press the right mouse button to bring up an edit menu. |
| |
 | Line Size |
| |
| |  | Use these to choose how thick your drawing line is. |
|
| |
| | Design Tools |
| |
| |  | Draws freehand lines. |
 | Draws straight lines. When you enter line mode, a dialog box will appear where you can select the line style. You can choose to have arrow-headed lines and callout boxes. To draw a callout box, drag the mouse to draw the line and then type in the text for the callout box followed by RETURN. |
 | Use for ovals and circles. To get a perfect circle hold down your shift key whilst drawing. |
 | Use to draw rectangles and squares. Again hold down the shift key for perfect squares. |
 | Use to create polygons. |
 | Draws solid circles and ovals. |
 | For solid squares and rectangles. |
 | For solid polygons. |
 | For transparent shaded polygons. |
 | Places words on your drawing. |
 | Fills an area with the current colour. |
 | Highlighter tool - draws transparent lines. |
 | Selects an eraser tool (white colour/large size). |
 | Use this to place an image into a design, much like a stamp. |
 | Use to draw, load and save complicated shapes quickly. For instructions, see the Advanced Features Guide |
|
| |
 | Zoom, Select, Point and Pan |
| |
| |  | Resets the zoom level to 100% |
 | Zoom in to the design. |
 | Zoom out from the design. |
 | Allows you to select a single object or range of objects. Either click with the mouse on the object you wish to select or click and hold the mouse button and a rectangle will appear. All objects will be selected that fall within the rectangle when you release the mouse button. Holding down the 'Shift' key selects a square area. |
 | Use this, much like a laser pointer to highlight items on all users' screens. |
 | Use to pan the image, left, right up or down. |
|
| |
 | Colour Palette |
| |
| |  | Pick one of these with your mouse to draw in that colour. |
 | Press this button to open an extended palette of colours. |
|
| |
 | Edit Controls |
| |
|
| |
 | Other Controls |
| |
| |  | * | Untick this checkbox to prevent normal (non-admin) users from drawing on the whiteboard. |
 | * | Untick this checkbox to prevent normal users from clearing the whiteboard. |
 | * | Untick this checkbox to prevent normal users from loading pictures. |
 | * | Brings up a window that shows people's drawing actions. |
 | | Displays the ban list, a list of IP addresses which have been banned from this Groupboard. |
 | | Opens the board information window containing the various board options and settings. |
 | * | Shows the chat window to allow you to talk to other users. |
 | | Displays the message board window. |
 | | Ticking this checkbox will mean that the thickness of the lines of the design will not change as you zoom in and out. |
 | | Allows you to display a grid to help with drawing. Can be set to snap design elements to it, making straight lines much easier. |
 | | Replace the white background with an image you can draw on top of. |
 | | Allows you to upload an image from your computer to the Groupboard to be used as a background (you will then need to use the Set Background button to view the picture). |
 | | This button allows you to upload an Autocad DXF file from your computer to the Groupboard as an image (you will then need to use the Load button to view the image). |
 | | Clear the entire design canvas ready for a new design. |
 | | Store away your drawing into the gallery. |
 | | Take an image from the gallery so you can draw on it some more. |
 | | Prints the contents of the whiteboard. |
 | | Get some help (come here). |
The buttons marked with a * will only appear when using the multi-user version of the board.
|
| |
 | Page Tabs and Useful Links |
| | Use the tabs to switch between different versions of the board:
- Click on 'Multi-User' to draw or mark-up with the other users also logged on to your Groupboard Designer.
- Click on 'Single-User' to draw or mark-up by yourself.
- Click on 'Gallery' for a list of pictures which have been previously saved.
- The drop-down screen resolution menu allows you to change the whiteboard size to fit in 1024x768, 1280x1024 or 1920x1200 screens. Note that all users should use the same size, otherwise unexpected results may occur.
|
| |
Use the links to see useful pages like this user guide. |
| |
 | Icons |
| | If any icons have been uploaded to your board, simply click on the icon and then click on the whiteboard to paste the icon onto the board. Please see the Admin Guide for details on uploading icons to the board.
|
| |
 | Pages |
| | Use the page controls to move between different whiteboard "pages". Initially there is just one page, but if you press the Next button you can add more pages. Move back to an existing page by using the Prev/Next buttons, or by choosing the page from the drop-down menu. By default the pages are named 1, 2, 3, etc., but you can rename the pages by simply editing the page name (to the right of "Clear All Pages"). When you Save or Load a design, all pages are saved/loaded together.
|