This document covers the advanced, adminstration side of Groupboard Designer and should be consulted after you understand the basic User Guide.
Topics :-
On some occasions it is useful to be able to restrict access to your board from certain IP addresses (An IP address is represented by four numbers seperated by dots, e.g. '123.23.1.234'). To do this we have added the 'Ban' ability and 'Ban List' to the board.
One of the quickest and easiest ways to ban a person from a board is to first select their name from the 'Chat To' list of the chat window and then simply press the 'Ban' button.
The person will be removed immediately from the board and their IP address will be added to the ban list to prevent them from logging in again.
We identify computers by their IP address so it is actually the computer and not the person (or name) that is banned - once an IP address is banned no one, not even an admin can log onto your board from that address, so be careful not to ban your own computer.
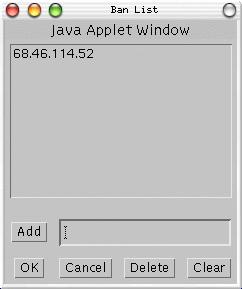
The next easiest way to ban people is to first obtain the IP address you wish to ban and then to open the ban list. Simply click on the 'Ban List' button and a new window will appear.
As you can see at the top of the image is a list of the currently banned IP addresses. (In this case there's only one).
At the bottom are the controls and an IP address entry box.
Typing the IP address into the box and then clicking the 'Add' button will add that IP address to the bottom of the ban list. This does not kick off anyone with that IP address, but rather means that they will be unable to log in again.
The 'Delete' button allows you to remove an IP address from the list. Select the address in the list that you wish to remove then click the 'Delete' button.
Finally the 'Clear' button completely empties the ban list.
One thing you have to bear in mind with the ban list is that it is not committed until you press the 'OK' button. If you press 'Cancel' any changes you make are discarded.
As you can see it is quite easy to ban single computers from your board, but what do you do if you want to ban a range of computers?
Sometimes it may be necessary to stop access from numerous IP addresses, which can be done using the asterisk '*' wildcard at the end of an IP address.
This means that if you needed to ban all IP addresses beginning '1.2.3' you would add '1.2.3.*' to the ban list.
If you wanted to ban all addresses beginning '34.128' you would add '34.128.*' to the list.
Remember that you can ban your own IP address, and if you were to add '*' by itself to the ban list it would mean that all addresses (including your own) would not be able to use the board.
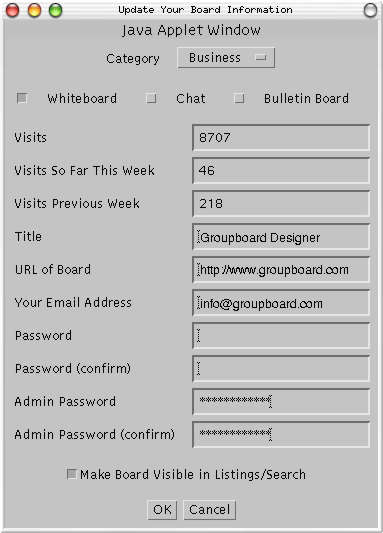
The above 'Board Info' window is the most important administration windows of the board. It allows you to change the layout of your board, the passwords and several other options. Going from top to bottom the options of your board are...
Board category. This is a category drop down list from which you should select the most appropriate keyword that describes your board.
Board display options. There are currently three optional parts to Groupboard Designer. The whiteboard, chat and bulletin board options can be turned on or off depending on your preferences. Simply check or uncheck the appropriate boxes and when finished click the 'OK' button to confirm.
NOTE - Some browsers can cache the old version of your board. To get around this just close your web browser (you do not need to go offline) and reopen it. Also be aware that you will need to hide or show the required buttons on your Groupboard Designer (see Customising Groupboard Designer for details).
The next three items are for information only, you can not change these items within the window.
'Visits' tells you the total number of visits made to your board since it was created. 'Visits so far this week' and 'Visits Previous Week' tell you the total number of visits for this week and last.
Title. This is the title for your board, you can change it at any time by selecting the text in this field, changing it and then clicking the 'OK' button.
URL of board. If you want, you can enter the URL of your Groupboard Designer here to allow other users to quickly access your board from our search list. If your Groupboard Designer is private just leave this blank.
Your Email Address. This should at all times be a valid admin email address so that we can contact you if there is a problem.
Password. This is the password that normal (non-admin) users must use for accessing your board. You can leave this blank if you don't want users to have to enter a password. You must also enter the password in the 'Confirm' box.
Admin Password. This is where you should enter your 'Admin' password, which must be different from your normal user password.
Make board available in listings/search. This checkbox changes the privacy of your board. If you wish other people to find your board in our search or listings then you can simply tick this box and the board becomes public. Unticking the checkbox makes it private and removes it from the lists and search. If you tick this box, you should ensure that the URL field (above) is correct.
If you are using the designer_3dlook.cgi script on our server to access your board, you can customise it by adding various parameters to the url. Note that if you copy Groupboard Designer to your own webpage you can do even more customisation (see the admin page for full details).
| Option | Default Value | Description |
|---|---|---|
| board_id | N/A | This is the id of your board, which the server uses to uniquely identify your Groupboard. |
| always_float | false | If set to true, the whiteboard and chat windows will be "floated" outside of the browser window in their own separate windows. |
| scale_to_fit | true | If set to true, background images will be scaled so that they fit the entire width or height of the whiteboard at 100% zoom. |
| use_utf | false | Set this to option to true if you intend using utf characters with Groupboard (e.g. Hebrew, Arabic, Japanese, Chinese, etc.) NOTE: we must also make a change on the server to enable utf characters for your board. Contact us for details. |
| show_icons | true | By default, if your board has any background images whose filenames begin with "icon_", they will be displayed above the whiteboard. Set this option to false to disable this. |
| icon_scale | If you have show_icons set to true, this option will force all of the icons to be scaled to a maximum width and height given by this parameter (but the aspect ratio is not changed). | |
| java_version | java_v3 | This option sets the java codebase to use. This can be changed if you want to use a different translation of Groupboard Designer. Contact us for details. |
| show_tabs | true | Set this option to false if you want to remove the tabs at the top of the page (multi-user, single-user, etc). |
| need_password | false | Set this option to true if you want the user to be prompted for a password when logging on. |
| scrollbars | true | Set this option to false if you want to hide the scrollbars in the whiteboard. |
| groupconf | false | Set this option to true to display the Groupconf voice conferencing module (NOTE: you must have purchased the voice conferencing option). |
| groupconf_id | N/A | If you have set groupconf to true, you must also set the groupconf_id. Normally this is the same as your board_id. |
| allow_nonadmin_upload | false | Set this to true if you wish to allow non-admin users to upload background images to your board (NOTE: we also need to set an option on the server to enable this for your board. Contact us for details). |
| admin | false | Set this to true to display the admin buttons. Note that the user needs to enter the correct admin password to actually use the admin features. |
| password | You can optionally pass in the password for the board using this parameter. | |
| hide_clear | false | Set this to true to hide the Clear button. |
| hide_chat | false | Set this to true to hide the Chat button. |
| hide_messages | false | Set this to true to hide the Messages button. |
| embedded_chat | false | Set this to true to display the chat window below the whiteboard (instead of having a Chat button). |
| singleuser | false | Set this to true if you want a single-user board (i.e. each user has their own copy of the whiteboard). |
| use_tunnel | false | Set this to true if you want to use firewall tunnelling. Normally firewall tunnelling is only used if the browser cannot connect directly, but with some firewalls it could take a few minutes so you might want to force firewall tunnelling. Note that firewall tunnelling is slower than connecting directly, so you should only use it if you have to. Most firewalls do not block Groupboard, so firewall tunnelling is not usually needed. |
| width | 670 | The overall width of the java applet. |
| height | 530 | The overall height of the java applet. |
| board_width | 640 | The width of the whiteboard (not including scroll bars). Note that you must increase width by the same amount that you increase board_width. |
| board_height | 480 | The height of the whiteboard (not including scroll bars). Note that you must increase height by the same amount that you increase board_height. |
If you have some knowledge of HTML, it is reasonably straight-forward to put Groupboard Designer onto your own webpage. The steps are as follows:
Whether you take a copy of the existing page or create your own page you can then edit the page and customise the HTML to your own requirements. See our Groupboard Admin Documentation for details of the various HTML tags you can use to customise the Groupboard.
If you just want a simplified version of Groupboard Designer without the complexity of JavaScript, you can click on the "non-JavaScript version" link at the bottom of your board's page. You can then save the HTML code from this non-JavaScript version, and then simply copy the HTML code between (and including) the <APPLET> and </APPLET> tags.