Groupboard Designer Manual
Introduction
Groupboard Designer is a multi-user Java applet developed from the Groupboard. Potential uses include advertising, product and graphic design. To achieve this it has additional features to the Groupboard such as cut, paste, zoom and a user-defined tool library.
Because Groupboard Designer is a Java applet and is compatible with the majority of web-browsers it has the advantages of allowing long-distance use on customer's machines without a lengthy download or install process, as well as being platform independent.
This means you can get down to the task of design or consulting quickly and easily - even on a customer's site using any computer with internet access. You can even have a 'conference' of people each in different sites annotating a design.
Groupboard Designer Overview
 |
|
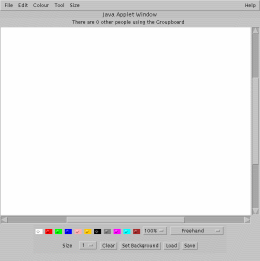
To the left is a small screen shot of one version of Groupboard Designer - you can click upon it for a larger image. There are several variations of layout possible - most importantly it is possible to add multi-user chat capabilities to the application. We have disabled it in our demo for simplicity.
There are three main sections to the Groupboard Designer: the main menu, design canvas and a current drawing mode section... |
Located at the top of the application the main menu contains 'File' and 'Edit' menus in addition to a duplication of the drawing mode operations (which are detailed later).
The design canvas can be drawn upon with the mouse. Items can also be selected, edited, moved and deleted, text placed and items pointed at or zoomed into.
The drawing mode section contains the controls with which you can set your drawing colour, size, tool and the level of zoom for the canvas.
The exact appearance, layout and nature of each control will also depend on your browser and operating system; apart from these cosmetic differences they will function as described.
Getting Started - Basic Drawing...
Drawing upon the canvas is very simple. Using the default 'Freehand' tool, place the mouse within the canvas area and press and hold down your left mouse button. Wherever you move the mouse within the canvas a line will be drawn in your selected colour. In multi-user mode your drawing will also appears on the other users' screens in real-time.
Clicking with the right mouse button brings up the Edit Menu which is covered later.
 |
|
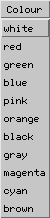
Taking things one step at a time you may want to change your drawing colour. To the left is the 'Colour' menu which is located at the top of the applet. This menu gives you a text list of colours to choose from, to change your current colour just click upon the one you want.
Another way to change colour is to use the simple colour palette located at the bottom of the applet (shown below). Select a new colour by clicking upon the corresponding checkbox.

NOTE - If your board has the extended colour palette you will see a 'Colour' button instead of this row of checkboxes. In this case, clicking the 'Colour' button will bring up a new window containing a range of different colours. To change the colour, simply click on the one you want. |
Now you have your colour set you may want to change the size or thickness of the line you're drawing. Again there are two ways to do this, at the bottom of the applet is a 'Size' drop down list and at the top of the applet is a 'Size' menu.
Both these lists are identical and work in the same way, just select the new size from the list, 1 is smallest and 10 is largest. But be aware that this 'Size' effects not only the thickness of lines you draw, but also the size of the text font that you can place upon the canvas.
Using the Tool list...
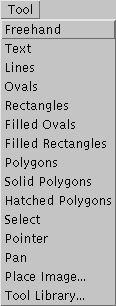
Once you've mastered the use of colour and size you may want to change the 'Tool' you are using. That is, what will happen when you click upon the canvas with the mouse.
From the 'Tool' menu or drop down list at the bottom of the applet you can choose one of the following...
Explaining each tool in turn :-
(Where appropriate each tool will draw in the previously choosen colour and size.)
 |
|
- Freehand - As described above, pressing or holding the mouse button whilst within the canvas will create a freehand line.
- Text - Use this tool to add text to the canvas. Position the mouse and click the left mouse button. Typing will then produce text at that position.
- Lines - Produces a ruled or straight line. Click and hold the mouse button where you wish the line to start and release the mouse button to draw the line. Hold down the 'Shift' key for horizontal, vertical or diagonal lines.
- Ovals - Click and hold the mouse button to start an oval, release to draw the oval. Hold down the 'Shift' key for perfect circles.
- Rectangles - Click and hold the mouse button to start a rectangle, release to draw it. Holding down the 'Shift' key produces squares.
- Filled Ovals - Operates in the same way as 'Ovals' but the oval will be filled in.
- Filled Rectangles - Again this operates as for 'Rectangles' but fills the rectangle too.
- Polygons - Use this to produce multi-sided straight edged shapes. You draw a polygon by giving the position of each corner of each edge. The first time you click will specify the first corner, the second time the second corner etc. as you do this lines will be drawn showing each edge. To close a polygon and connect the last corner to the first you simply double click with the mouse.
- Solid Polygons - If you wish to produce solidly filled polygons use this tool.
- Hatched Polygons - For polygons with a hatched fill that is semi-transparent use this tool.
- Select - Allows you to select a single drawn object or range of drawn objects. Either click with the mouse upon the object you wish to select or click and hold the mouse button and a rectangle will appear. All objects will be selected that fall within the rectangle when you release the mouse button. Holding down the 'Shift' key selects a square area.
- Pointer - This is similar in concept to a laser pointer; it will NOT make any changes to the design. When you are using Groupboard Designer in multi-user mode you may wish to indicate to another user an object. By holding down the mouse button a cursor will appear on every user's window at the same position. You can move the mouse when pointing for emphasis and the same movement will occur on all windows.
- Pan - Should you be zoomed into a design you may wish to pan or move the viewpoint to see other sections of a design. To do so click and drag the mouse and the design should follow. Release the mouse button when you are satified with the new position. Drawing details that you cannot see are NOT lost, but will just be off-screen. NOTE - Depending on the Groupboard setup it is possible to make Panning and Zooming affect other users. If your board is set up with scrollbars, you can also pan by moving these scrollbars.
|
There are several steps involved in the use of both the 'Place Image...' and 'Tool Library...' and these are described on the next page.
Next Page
