Groupboard Designer Manual
Advanced Features
After covering the basic drawing features we now move on to the more specialised tools and features exclusive to Groupboard Designer.
These tools greatly enhance the possible uses of the Groupboard as well as the speed and ease with which a complex design can be produced.
Place Image...
 |
|
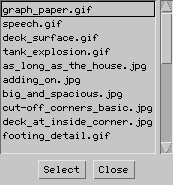
After selecting this tool a new window will appear (show on the left) from which you can select the image you wish to use. The images listed within this window are the same as those used for the 'Set Background' tool. Once you've selected the image you wish to use, click 'Select'. From this point on clicking with your mouse upon the canvas will paste a copy of the selected image at that mouse position.
In a way the 'Place Image' tool works much like a rubber stamp (especially with transparent images) to allow the user to rapidly build up complex designs. |
Tool Library...
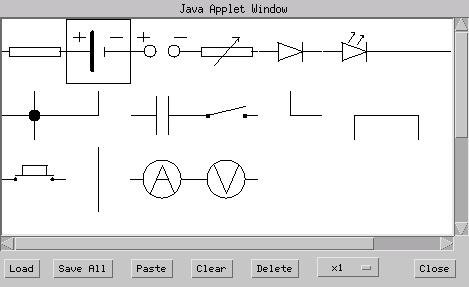
Once this tool is selected a new 'Tool Library' window will appear (shown left). From this window you can select a tool which you can then place within the canvas by clicking with the left mouse button. You can load various libraries of tools, add or remove tools and even save your tools as a library.
Below is a description of each of the buttons within this window described in turn...
- Load -
 |
|
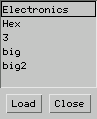
Opens a window containing a list of libraries you can load into the Tool Library window. Select one from the list and click on the 'Load' button in the list window for the tools to be displayed. If you are logged on as admin, you will also have a 'Delete' button which lets you delete saved tool libraries. |
- Save All - Clicking this button allows you to save all the tools currently within the Tool Library window.
- Paste - If you have copied a section of a drawing from the canvas you can click this button to paste it into the current tool library for re-use. Each tool is 64x64 pixels in size (at 100% magnification), and if the pasted image is larger than this then it will be reduced to fit (but keeping the same aspect ratio).
- Clear - Empties the Tool Library - this does NOT destroy any tool libraries you have saved.
- Delete - Allows you to remove a single tool from the library. Select the tool you wish to remove by clicking upon it then pressing this button. Note that deleting an individual tool from the library does not affect any saved tools on the server (until you click on 'Save All').
- Size selection -
 |
|
This is actually a drop down list of choices of the amount by which the tool will be magnified when drawn to the canvas. Each tool is by default drawn at actual size, but you can select either another magnification value or 'Custom'. When placing a tool with 'Custom' magnification you drag the rubber band until it reaches the required size. |
NOTE - Custom also allows you to 'Flip' a tool. The direction you drag the rubber band away from the starting point determines the direction of flip. Dragging from top-left to bottom-right will always draw the tool in the normal way, dragging upward will flip the tool about it's horizontal axis, whilst dragging to the left will flip the tool about it's vertical axis. Dragging to the top-left will flip the tool about both axis. Holding the 'Shift' key down whilst using the 'Custom' magnification will ensure the tool is drawn in it's original aspect ratio.
- Close - Click this to close the Tool Library window.
Non-Drawing Controls...
At the bottom of the applet, in addition to the basic controls are some non-drawing controls that need explaining, they are the 'Zoom' 'Clear' and 'Set Background' controls. There is also an optional 'Float' button which can appear nearby. (Both the 'Clear' and 'Set Background' buttons also appear in the 'File' menu at the top of the applet.)
- Zoom - This drop down list gives you a choice of zoom level at which the design can be viewed. Useful for seeing a whole design at once. It is possible when using the Groupboard Designer in multi-user form for the zoom level and position to effect all users.
- Clear - A simple, but powerful, button. Pressing this clears the entire design. All changes will be lost! NOTE - If you have set a background image it will remain as the current background after the clear.
- Set Background -
 |
|
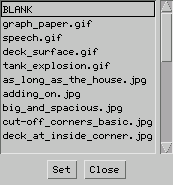
Allows you to choose a background for a design from a set of images already stored on the server. A Set Background window will appear (shown on left) from which you can select a file. Clicking 'OK' will load that background - depending on size and network speed this can take a few moments.
If you have logged in as admin, you will see an 'Upload' button on this window, which allows images (either '.gif' or '.jpg') to be uploaded for use within the Groupboard. |
- Float - This button will float or free the applet from the web page (if it is imbedded within a web page). The applet will then look and act more like a conventional program and will have menus at the top of the applet as described in this manual.
Loading and Saving...
Once you've created a design you will most likely wish to save it for future use, to do this you can either click on the 'Save' button at the bottom of the applet or select 'Save' from the 'File' menu that is at the top of the applet. Once you do this a new window will appear, looking something like the one below.
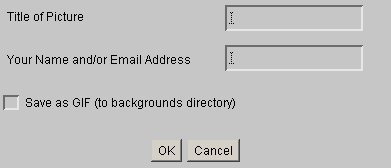
Enter a filename for the picture and your details and the file will be saved on the server making it accessible at a later date or even a different location. If you want to save the design in Gif format, just tick the "Save to GIF" box. The picture will then be saved to the backgrounds directory and can be loaded by using the "Set Background" button.
Loading a design is just as simple, clicking the 'Load' button or selecting 'Open' from the 'File' menu produces the below window.
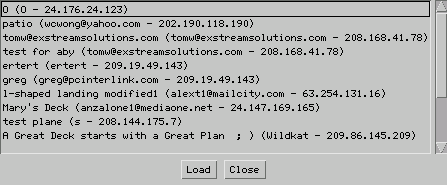
Select the file you wish to load with the mouse, then click 'Load'. The design will load into the drawing canvas. Notice that the file details include the filename, user details and their IP address, which allows you to check who last made a change.
New! - It is now possible to load AutoCAD ASCII '.dxf' files just like normal Groupboard designer files as long as they have been previously been uploaded to the server.
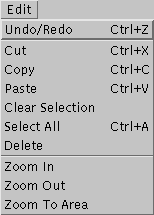
One of the most powerful advances for the Groupboard Designer is the ability to select previously drawn items and manipulate them. The 'Edit' menu shown below has all the commands available for making this kinds of changes each is described in turn.
 |
|
- Undo/Redo - Undos the last action performed (except clear) or Redos a previous undo. Currently only one level of undo is available.
- Cut - Cuts any selected items from the canvas, but keeps a copy that can be later pasted.
- Copy - Takes a copy of any selected items from the canvas, leaving the selected item unchanged. This copy can be repasted into the canvas or even the Tool Library.
- Paste - Pastes a copy of any previously copied or cut items into the canvas.
- Clear Selection - Cancels all selections so that no drawn item is selected.
- Select All - Selects all items drawn upon the canvas.
- Delete - Deletes all the selected items.
- Zoom In - Increases the zoom level of the canvas step by step.
- Zoom Out - Reduces the zoom level of the canvas step by step.
- Zoom to Area - If you have selected a rectangular area using the 'Select' tool, you can zoom into it by selecting this command.
|
NOTE- The Edit Menu is also available by right clicking with your mouse whilst in the canvas.
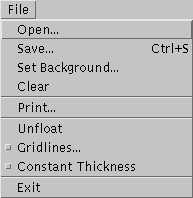
The File Menu...
The 'File' menu contains the basic design file commands - 'Open', 'Save', 'Set Background' and 'Clear' having already been covered above, but there are some other commands described below.
 |
|
- Print - If your browser permits printing you can print a copy of the design using this command.
- Gridlines... - Allows you to place a set of Gridlines over an area in the canvas. Also allows you to turn on or off drawing actions snapping to those gridlines.
- Constant Thickness - Selecting this option forces lines to always be the same thickness, even when zoomed in. This is useful when viewing AutoCAD '.dxf' files.
- Unfloat - An applet is considered to be floating when it is free or separate from a web page. Clicking on this command will replace the applet into the web page it has come from and the menu commands will no longer be available.
- Exit - Exits the applet and closes all windows. Any unsaved designs will be lost.
|
Previous Page